Your workplace needs more WOW. Get ready for MHR's World of Work 2026
Image

API Requests
People First API requests are made to one of a number of RESTful endpoints. All API requests need to provide, as a minimum, the organisation's tenant code, environment code, and ther caller's authentication credentials. A simple HTTP request to a user's global profile endpoint might look like this:
GET /api/profile HTTP/1.1
        Host: TENANT_CODE-ENVIRONMENT_CODE.people-first.com
        Accept-Language: en-GB
        Content-Type: application/json; charset=utf-8
        TenantCode: TENANT_CODE
        EnvironmentCode: ENVIRONMENT_CODE
        Authorization: Bearer ACCESS_TOKEN
Where:
TENANT_CODEis the tenant code that was provided by MHR.ENVIRONMENT_CODEis the environment code that was provided by MHR. When accessing your default environment (typically your production environment) the -ENVIRONMENT_CODEhostname segment, andEnvironmentCodeHTTP header field can be omitted.ACCESS_TOKENis the access token supplied by your System Administrator, or ID token obtained separately (see:OIDC ID Tokens).
An example cURL command to construct the above request would be something like:
curl --location --request GET "https://tpruk-dev.people-first.com/api/profile" \
            --header "TenantCode: tpruk" \
            --header "EnvironmentCode: dev" \
            --header "Accept-Language: en-GB" \
            --header "Content-Type: application/json; charset=utf-8" \
            --header "Authorization: Bearer eyJ0eXAiOiJKVMsntWbLxWnNnRNZva2iueYc7KTFKP1Kz6Paog
Note: The URI segment: https://TENANT_CODE-ENVIRONMENT_CODE.people-first.com is commonly referred to as the "People First Base URI"
REST API Integration
Overview
Applications need to be configured within the People First system before they can be granted access to the REST APIs, and an access/bearer token issued.
Application Configuration
Applications are configured using the Create Inbound Integration dialog screen. This can be accessed by pressing the + symbol against the Inbound Integration side menu item within the Settings page of the Administration App.
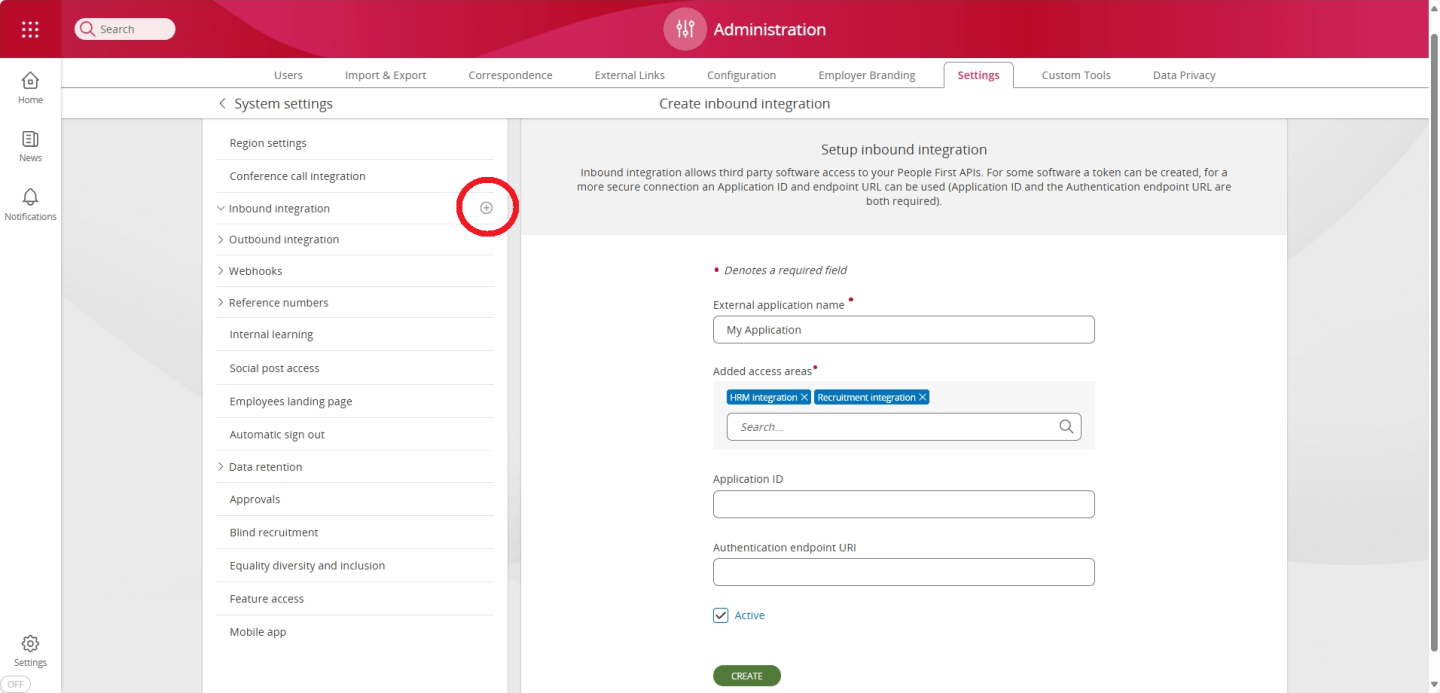
To configure an application, as a minimum, you will need to supply;
| Field name | Description |
|---|---|
| External application name | A human readable name for the application. |
| Grant user roles access to | A list of roles that are to be granted to the application - these will determine which areas of the system, and data entities can be accessed by the application. |
| Active | A flag to indicate whether the application access is active or not. |
If you are using the client credentials flow to request an access token, instead of generating one manually, you will also need to specify;
| Field name | Description |
|---|---|
| Application ID | The application ID (aka client ID) of the application within the identity provider being used. |
| Authentication endpoint URI | This is the Issuer Identifier URL for the identity provider issuing the access token. The OIDC Provider Configuration document (see: Obtaining OpenID Provider Configuration Information) must be available at the URL formed by appending /.well-known/openid-configuration to this URI. |
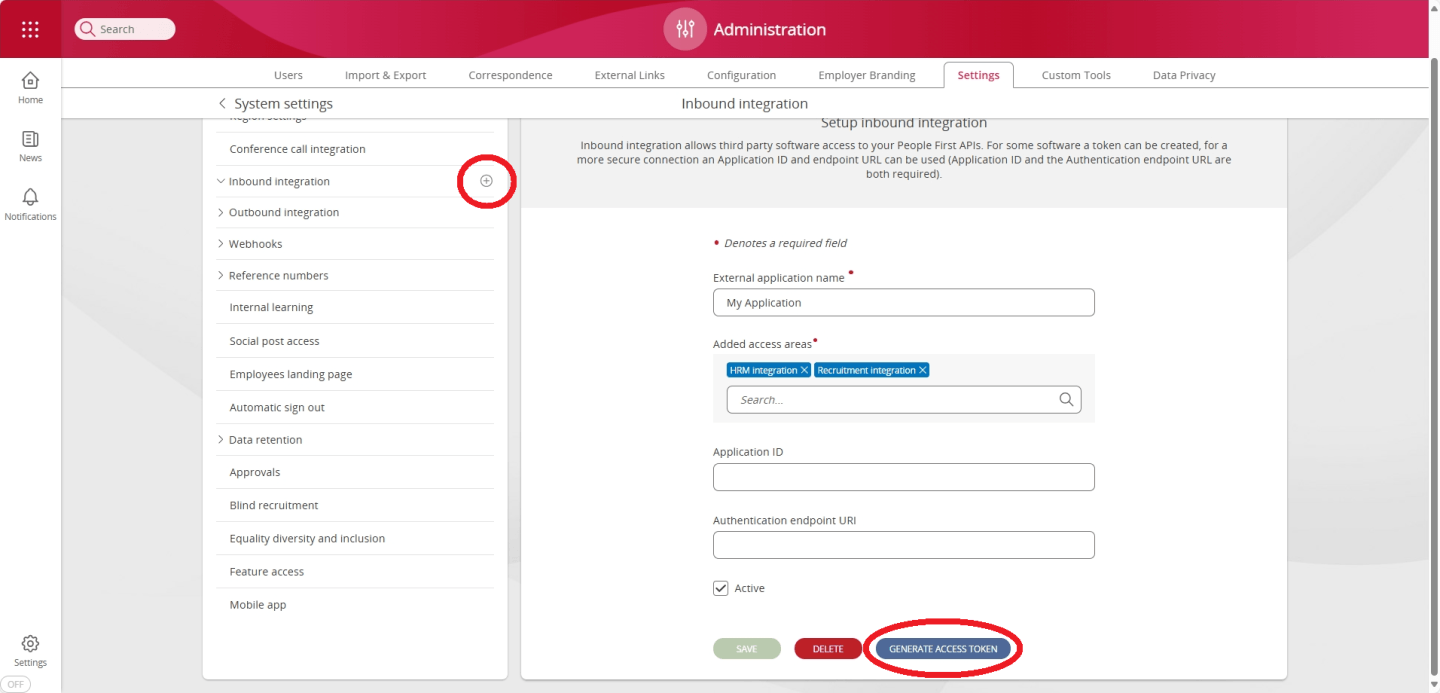
Access Token Generation (recommended)
The recommended method for obtaining an access token is to generate one from within the People First System Settings area. This can be achieved by pressing the Generate Access Token button in the Inbound Integration panel for the application you wish to create a token for, or by pressing the + symbol against the application name underneath the Inbound Integration side menu item.
This will bring up the Generate access Token page;
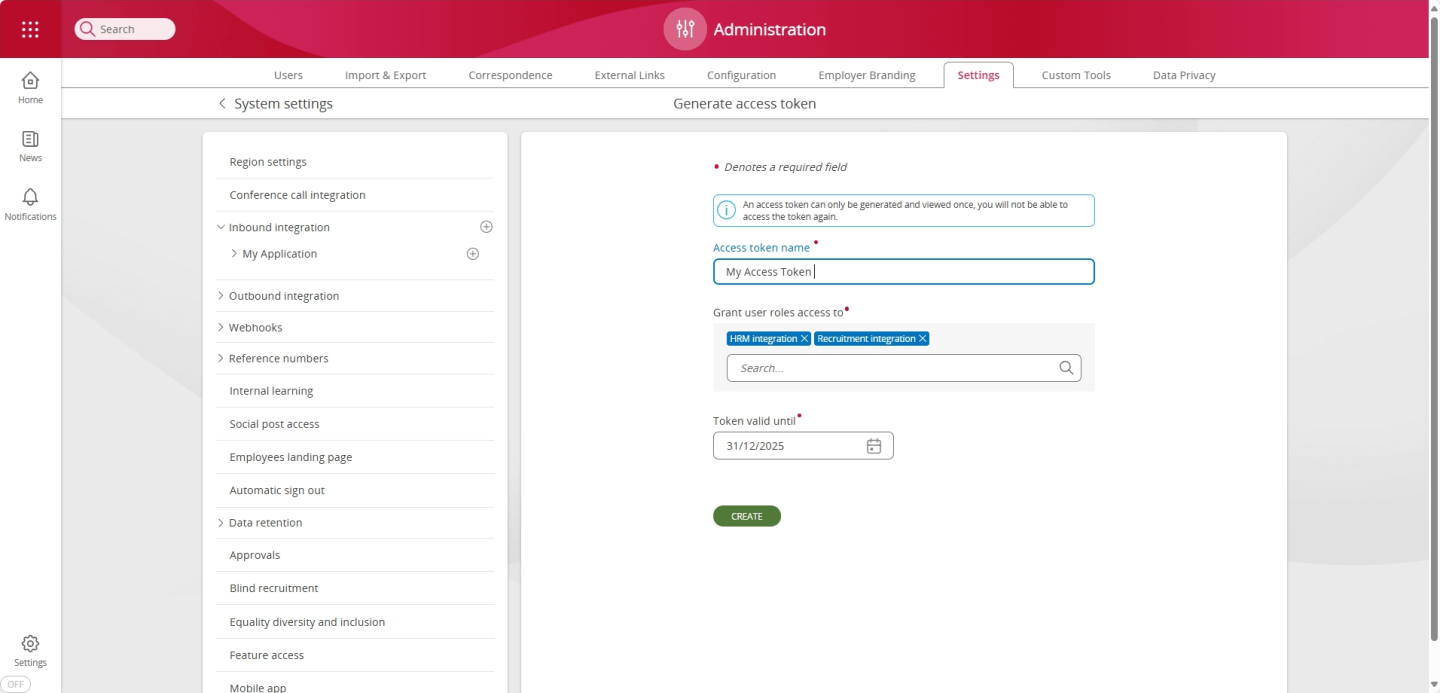
You will be required to enter the following details;
| Field name | Description |
|---|---|
| Access token name - this is a human readable name for the token being generated. | |
| Grant user roles access to | A list of roles that are to be granted to the application - these will determine which areas of the system, and data entities can be accessed by the application using this specific access token. |
| Token valid until | The access token will expire at 00:00 on this date. |
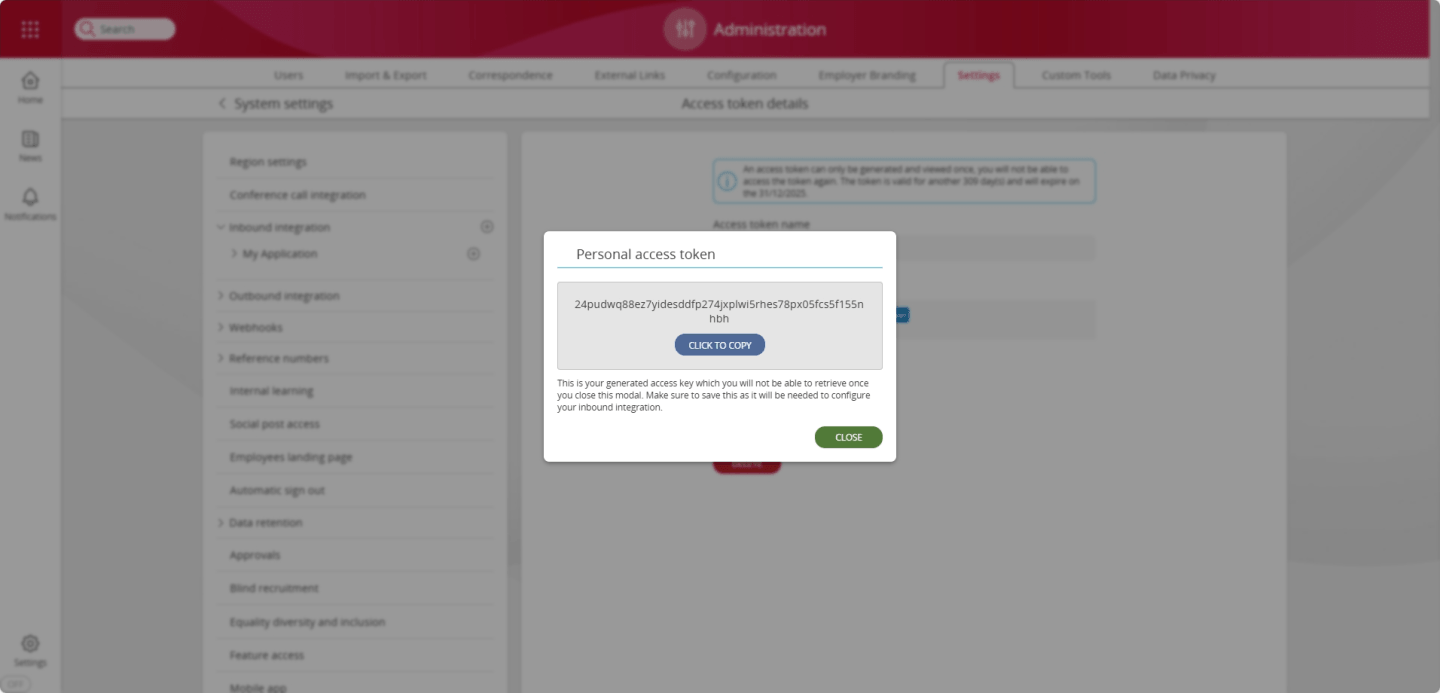
Upon selecting Create, you will be presented with a dialog displaying the generated access token. You will not be able to view the access token once this dialog has been dismissed.
Access Token Requesting
An alternative method for obtaining an access token is to request one from an authentication/authorisation server using the OAuth2 client credentials flow (see: rfc6749. This is a much more complex procedure and generally only required where a generated token cannot be supported, such as with some third-party partner integrations.
The general flow is as follows, the client makes a request to an authorization server for an access token passing a client id, a client secret and a resource. These will be provided by MHR to partners. It is the responsibility of the client to keep these credentials safe.
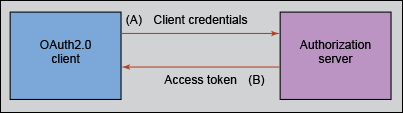
The client can then pass this access token to the server protecting the resource (i.e. the API) which will use the access token to allow or deny access depending on the contents of the token.
Webhook API Integration
Overview
People First can be configured to send real-time events to external systems (see: Event Stream API). This is commonly used to satisfy real time systems integration requirements. People First uses Webhook callbacks to deliver the events. Webhooks can be configured for any event type and are secured with a HMAC signature.
Configuration
Webhooks can be configured through the webhook configuration section in the administration area. To configure a new webhook, press the + symbol within the Webhook side menu item within the Settings page of the Administration App.
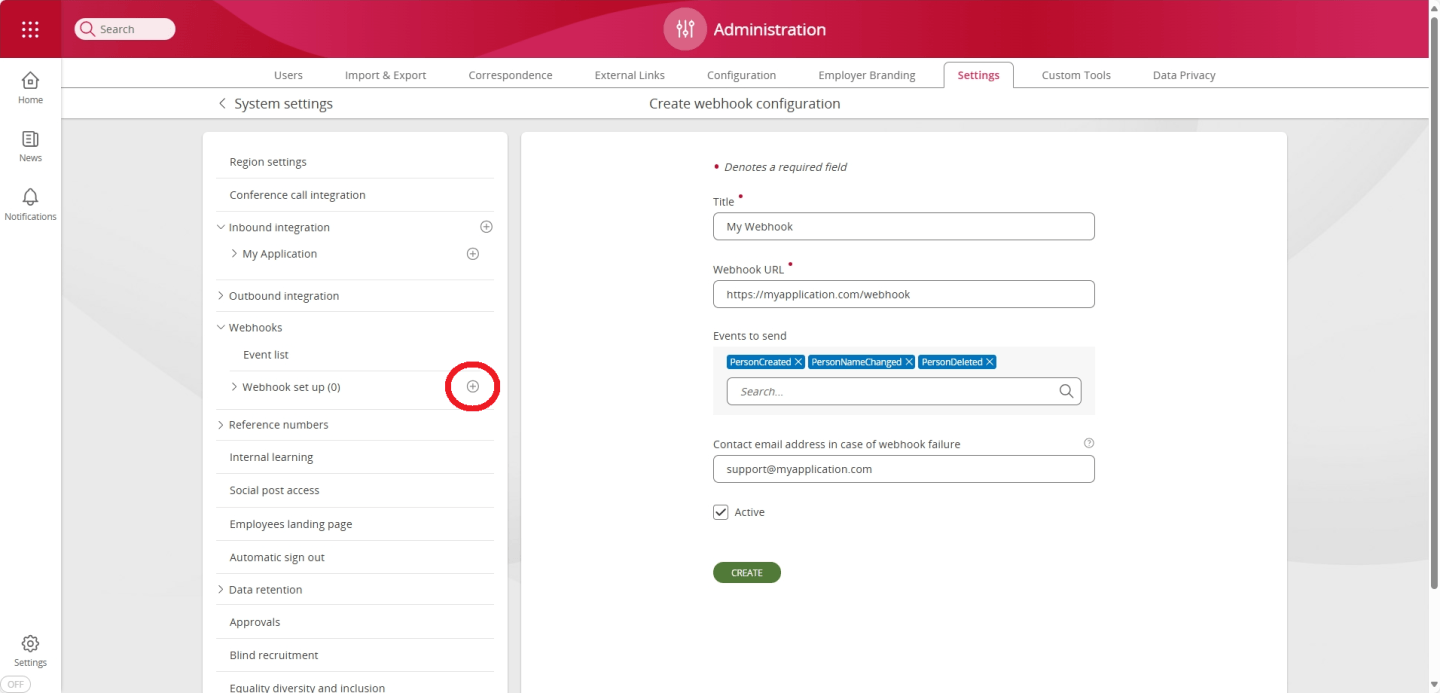
You will be required to enter the following details;
| Field name | Description |
|---|---|
| Title | A name to identify the webhook. |
| Webhook Url | HTTPS endpoint URI where the webhook calls (requests) will be POST(ed). The endpoint must use TLS (HTTPS). |
| Events to send | A list of events that will be sent to the webhook endpoint. The events are listed here. |
| Contact email address in case of webhook failure | If any of your webhooks report a failure, someone in your organisation is prompted. Group email addresses are permitted. |
| Active | Status of the webhook. Events will only be sent to the webhook endpoint if this is active. |
| Generate Access Key | This button is used to generate and display (one-time) the HMAC key. This key is required to verify the HMAC Signature and must be securely stored. |
Once your webhook is configured, you will need to generate an access (HMAC) key. This will enable you to verify the authenticity of the webhook messages you receive.
To do this, press the Generate Access Key button within the configuration page of your newly created webhook.
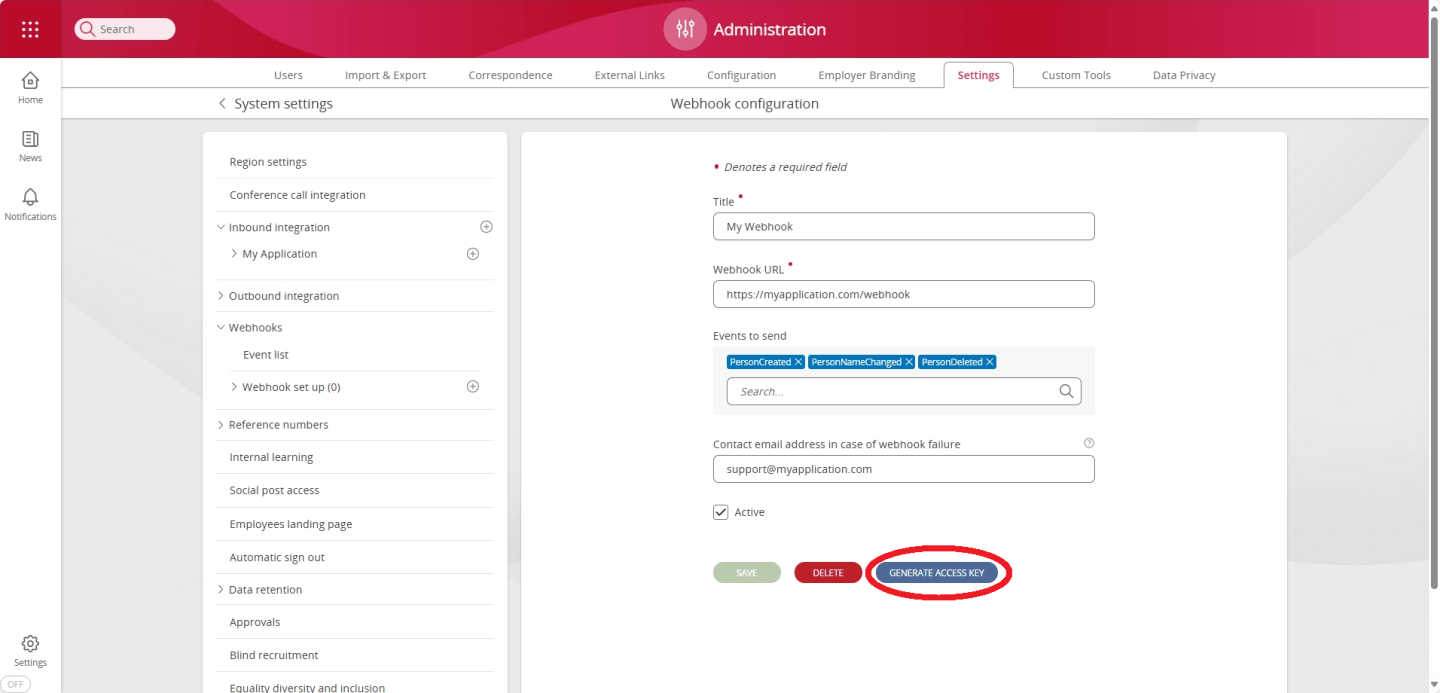
You will then be presented with a dialog displaying the generated access key. You will not be able to view the access key once this dialog has been dismissed.
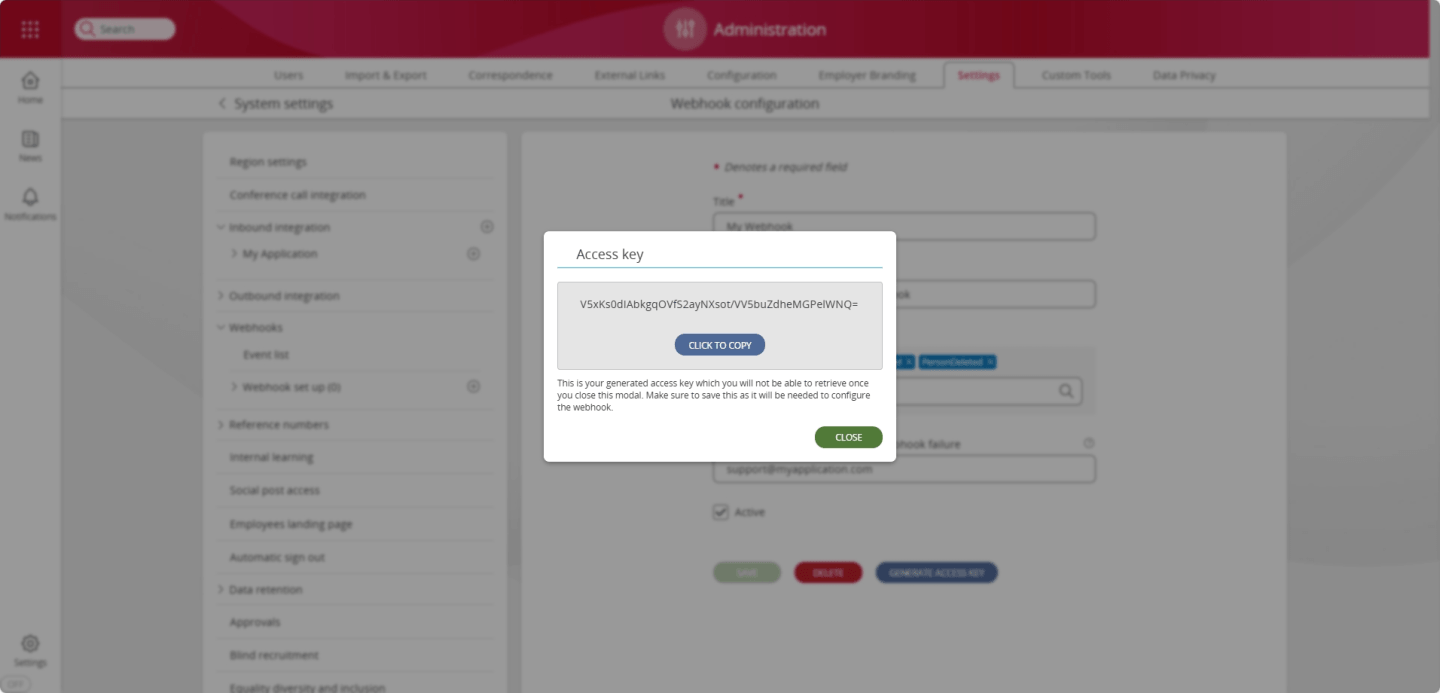
NOTE: It is imperative that the access (HMAC) key is stored securely. If it is compromised, then a malicious attacker could use the key to mimic requests that appear to originate from People First. People First will only display the HMAC key at the point of generation, after which the key is encrypted and never again surfaced over the api. If the key is lost, or there is any risk it may have been disclosed, or compromised, then a new key must be generated by pressing the "Generate Access Key" button within the configuration page of the affected webhook.
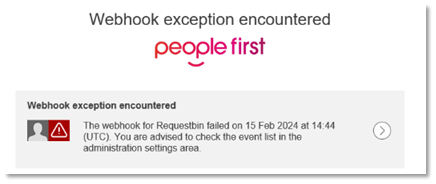
If the contact email address is updated and a problem is encountered, an email will be received that looks like this:
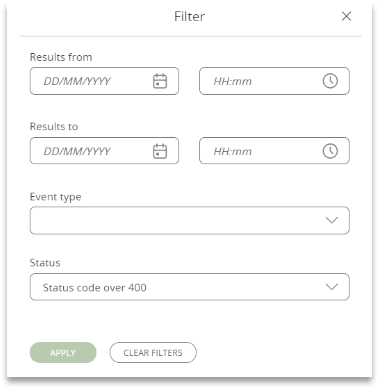
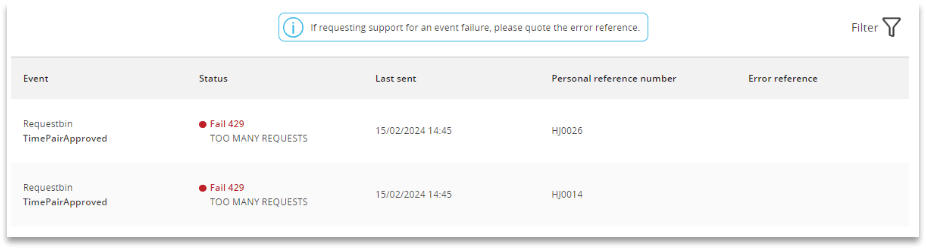
The event list (found in the same area) shows which webhooks ran. It shows the event name, status, date sent and the personal reference number of the person whose data was sent. A filter is available in the top right, enabling you to search for any problems.
The personal reference number allows you to identify the person affected - and maybe, manually check their data. Where a serious error has been identified an error reference will be shown. Quote this when reporting the message as this will enable our staff to look at the background error report.
HMAC Signature Verification
All People First webhook request messages are digitally signed using a hash-based machine authentication code (HMAC). This allows the webhook consumer to verify that the request originated from People First and that it's content wasn't changed in transit.
All webhook requests will contain a HMAC signature. The HMAC signature is provided within the peoplefirst-signature HTTP header of the webhook request.
In order to verify that the request is from a trusted source follow these steps:
- Base64 decode the HMAC key generated for the webhook.
- Hash the HTTP request body using the decoded HMAC key from step 1, and the HMAC-SHA256 algorithm. The body will be UTF8 encoded.
- Base64 encode the hash computed in the step 2.
- Compare the base64 encoded value computed in step 3 with the value obtained from the
peoplefirst-signatureHTTP header. - If the two values match, then the request was sent from People First and it's content hasn't been modified.
// A Postman Test that calculates the HMAC hash and verifies that it matches the supplied signature
//
// The signature has already been extracted and stored in the "peoplefirst-signature" variable.
// The HMAC key has already been stored in the "PeopleFirstEventStreamHmacKey" variable.
//
let peopleFirstSignature = pm.variables.get("peoplefirst-signature");

pm.test("verify signature", function(){

    let base64EncodedHmacKey = pm.variables.get("PeopleFirstEventStreamHmacKey");
    let decodedHmacKey = CryptoJS.enc.Base64.parse(base64EncodedHmacKey);
    let sha256signature = CryptoJS.HmacSHA256(pm.response.text(), decodedHmacKey).toString(CryptoJS.enc.Base64);

    pm.expect(sha256signature).to.eql(peopleFirstSignature);
});
  # A PowerShell script that calculates the HMAC hash and verifies that it matches the supplied signature

  $peoplefirstWebhookHmacKey = "WEBHOOK_HMAC_KEY>"
  $peoplefirstSignature = "WEBHOOK_SIGNATURE"
  $body = 'WEBHOOK_REQUEST_BODY'


  # Step 1. Base64 decode the HMAC key generated for the webhook.
  $decodedHmacKeyBytes = [System.Convert]::FromBase64String($peoplefirstWebhookHmacKey)

  # Step 2. Hash the HTTP request body using the decoded HMAC key from step 1, and the HMAC-SHA256 algorithm. The body will be UTF8 encoded.
  $hmacSha = New-Object System.Security.Cryptography.HMACSHA256
  $hmacSha.key = $decodedHmacKeyBytes
  $hashedBody = $hmacSha.ComputeHash([Text.Encoding]::UTF8.GetBytes($body))

  # Step 3. Base64 encode the hash computed in the step 2.
  $base64EncodedHashedBody = [Convert]::ToBase64String($hashedBody)

  # Step 4. Compare the base64 encoded value computed in step 3 with the value obtained from the peoplefirst-signature HTTP header.
  if ($base64EncodedHashedBody -eq $peoplefirstSignature)
  {
      Write-Host "Signatures MATCH : " -NoNewline
  }
  else
  {
      Write-Host "Signatures DO NOT MATCH : " -NoNewline
  }

  Write-Host "$base64EncodedHashedBody $peoplefirstSignature"